
Fundamentals
EffectSystem
Before using the Effect System, you must first create an EffectSystem class, which will be responsible for managing the states and calculations of all effects.
After creating a new instance of EffectSystem, call Init() to complete the basic setup.
var effectSystem = new EffectSystem();
effectSystem.Init();
In the Unity environment, EffectSystem uses the singleton pattern by default. After calling Init(), you can retrieve the instance using EffectSystem.Instance.
If you are on a platform outside of Unity, or if you prefer to manage the instance yourself, you can ignore EffectSystem.Instance and use your own dependency management solution to handle the EffectSystem instance.
IEffectableObject
The IEffectableObject interface allows a C# object to have effects added or removed. Whether it's an enemy, a character, a card, or any other object you want to apply effects to, it should be made into an IEffectableObject.
public interface IEffectableObject
{
    /// <summary>
    /// Gets the display name of the IEffectableObject.
    /// Not strictly required, but very helpful for debugging.
    /// </summary>
    /// <returns></returns>
    string GetDisplayName();

    /// <summary>
    /// Retrieves the parent Transform for the effect view based on the viewRoot.
    /// </summary>
    /// <param name="viewRoot"></param>
    /// <returns></returns>
    Transform GetEffectViewParent(string viewRoot);

    /// <summary>
    /// Determines whether this IEffectableObject accepts the application of the
    /// provided info. This method should only include checks and should not perform
    /// any operations on the effect.
    /// </summary>
    /// <param name="info"></param>
    /// <returns>Returns false if this IEffectableObject reject the effect request.</returns>
    bool ApprovedAddEffect(EffectInfo info);

    /// <summary>
    /// Triggered when an Effect Instance becomes active.
    /// </summary>
    /// <param name="info"></param>
    void OnEffectActive(EffectInfo info);

    /// <summary>
    /// Triggered when an Effect Instance becomes inactive.
    /// </summary>
    /// <param name="info"></param>
    void OnEffectDeactive(EffectInfo info);

    /// <summary>
    /// Determines if the object is still "alive". Effect can only be attached to a alive IEffectableObject.
    /// </summary>
    /// <returns></returns>
    bool IsAlive();

    /// <summary>
    /// Since the actual runtime values are maintained by the IEffectableObject,
    /// implement the values needed for your game.
    /// For example, ATK_Current = ATK_Constant * ATK_Ratio.
    /// </summary>
    /// <param name="parameterKey"></param>
    /// <returns></returns>
    float GetRuntimeValue(string parameterKey);

    /// <summary>
    /// Destroys the IEffectableObject.
    /// </summary>
    void DestoryEffectableObject();
}
Effect Instance
Objects generated at runtime that inherit from EffectInstanceBase are called effect instances. Effect instance is created based on EffectInfo. We’ll talk about that later. For now, you can think of EffectInfo as a storage space for various parameters of the effect.
Basic effect implementation
A basic effect can involve the addition or subtraction of a value. Therefore, simply declaring a class that inherits from EffectInstanceBase and adding a constructor will complete the implementation of an effect.
The Effect System uses reflection to find the class specified by the EffectInfo type. The search follows the naming convention of Effect_{type}, so you must name your EffectInstanceBase implementation according to this format.
//a basic implementation
public class Effect_ATK_Constant : EffectInstanceBase
{
    public Effect_ATK_Constant(EffectSystem effectSystem) : base(effectSystem)
    {

    }
}
Next, by calling EffectSystem.AddEffect and passing in the effect's owner and EffectInfo, you can create an effect instance and attach it to an IEffectableObject.
// Define two effects with the same type
var effectAddAtkSmall = new EffectInfo{
    id = "AddAtkSmall",
    type = "ATK_Constant",
    value = 100,
    /// Other parameters are ignored in this example
};

IEffectableObject player;
//Get the EffectSystem using your dependency management solution
EffectSystem effectSystem;

effectSystem.AddEffect(target, effectAddAtkSmall);

var sumValue = effectSystem.GetEffectSum( player, "ATK_Constant");
// // sumValue is 100s
Advanced effect implementation
If you need more than just simple addition or subtraction of values, you can override the variables and methods provided by EffectInstanceBase, and customize the behavior of the Effect.
Example:
// Create a new class that inherits from the EffectInstanceBase class
public class Effect_MyEffect : EffectInstanceBase
{
    public Effect_MyEffect(EffectSystem effectSystem) : base(effectSystem)
    {
    }
    /// <summary>If the effect value of this type for the owner exceeds the set value, the effect will not be applied.</summary>
    public override float maxEffectValue => 100;

    /// <summary>The upper and lower limits of the value obtained by this EffectType.</summary>
    public override (float min, float max) sumLimit => 100f;

    public Effect_MyEffect(EffectSystem effectSystem) : base(effectSystem)
    {
    }
    protected override void OnStart()
    {

    }
    public override void OnActive(EffectTriggerConditionInfo triggerConditionInfo)
    {

    }
    public override void OnDeactive(EffectTriggerConditionInfo triggerConditionInfo)
    {

    }
    public override void OnCooldownEnd()
    {

    }
}

// For a trigger-based effect, you can inherit from the EffectTriggerBase class
public class Effect_Myffect : EffectTriggerBase
{
    public Effect_MyEffect(EffectSystem effectSystem) : base(effectSystem)
    {
    }

    // Execute immediately after OnActive().
    protected override void OnTrigger(EffectTriggerConditionInfo conditionInfo)
    {

    }
}
EffectInfo
EffectInfo defines an effect by storing its settings but does not handle the runtime behavior.
| Field | Data Type | Description |
|---|---|---|
| id | string | The unique ID of an effect |
| type | string | The type of the effect |
| value | float | The value of the effect |
| activeCondition | string | The condition that triggers the effect |
| activeRequirementLists | string[] | The requirements for triggering the effect |
| activeProbability | float | The probability (0-1) of the effect being activated |
| deactiveCondition | string | The condition that deactivates the effect |
| deactiveRequirementLists | string[] | The requirements for deactivating the effect |
| deactiveProbability | float | The probability (0-1) of the effect being deactivated |
| maintainTime | float | The duration for which the effect remains active |
| cooldownTime | float | The cooldown time in seconds before the effect can be activated again |
| logic | enum | Life cycle management preset logic, see TriggerTransType for more details |
| triggerTransType | enum | An enumeration for managing the logic when the effect is triggered more than once, see EffectLifeCycleLogic for detailss |
| tags | string[] | Tags are typically used for categorization and can be checked to achieve more complex effects. |
| subInfoIds | string[] | At runtime, subInfoIds are converted into effect instances, which are used to achieve more complex effects. Check the SubInfo section for more details. |
| viewInfoIds | string[] | The IDs of the view data for the effect |
| parameters | Dictionary<string, string> | Parameters are designed as a string dictionary, allowing you to set custom variables and achieve more complex effects. |
Condition
activeCondition and deactiveCondition determines when an effect becomes active and when it deactivates.
| Field | Data Type | Description |
|---|---|---|
| activeCondition | string | The condition that triggers the effect activation |
| deactiveCondition | string | The condition that triggers the effect deactivation |
Example:
var effectAddAtkSmall = new EffectInfo{
    id = "AddAtkSmall",
    type = "ATK_Constant",
    activeCondition = "ConditionOnAttack"
};
EffectSystem effectSystem;
MyCharacter character = new MyCharacter();

effectSystem.AddRequestedEffects(target, effectAddAtkSmall); // first add call

class MyCharacter: IEffectableObject {
    void DoAttack(){
        // All Effect Instances on 'this' object with activeCondition == "ConditionOnAttack" will attempt to activate.
        effectSystem.EffectTriggerCondition("ConditionOnAttack", this);
    }
}
The system provides two default conditions, which it will attempt to execute when processing the effect's lifecycle:
ActiveCondition.OnEffectStart
This active condition is fulfilled as soon as the effect is applied to an IEffectableObject, and it immediately triggers OnActive().
DeactiveCondition.AfterActive
This deactive condition is fulfilled once OnActive() has been executed, and it immediately triggers OnDeactive().
RequirementLists
activeRequirementLists and deactiveRequirementLists are used to add constraints to condition triggers. The condition will only be triggered if these constraints are met.
| Field | Data Type | Description |
|---|---|---|
| activeRequirementLists | string[] | The qualifications required to activate the effect |
| deactiveRequirementLists | string[] | The qualifications required to deactivate the effect |
A requirement is defined by the ConditionRequirement class, and a ConditionRequirement is a check against a specific value.
Example:
//This ConditionRequirement checks if the owner's HP is below 30%.
var conditionExample = new ConditionRequirement{
    id = "isLowHealth",
    conditionParameter= "HP_Ratio",
    requirementLogic= ConditionLogic.Less,
    conditionValue= 30,
    isCheckOwner= true,
};
To set a requirement, you first need to inject a method to query ConditionRequirement. Then, fill in the ID of ConditionRequirement in the requirementLists of EffectInfo. This way, the effect can find the corresponding ConditionRequirement at runtime.
public class SkillSystem
{
    //prepare your activeRequirements data
    static List<ConditionRequirement> activeRequirements = new List<ConditionRequirement>();
    static List<ConditionRequirement> deactiveRequirements = new List<ConditionRequirement>();

    // register methods to get corresponding requirements
    void RegisterStaticMethods()
    {
        if (EffectInfo.GetActiveRequirementLists == null)
        {
            EffectInfo.GetActiveRequirementLists = (m) =>
            {
                return GetActiveRequirements(m);
            };
        }
        if (EffectInfo.GetDeactiveRequirementLists == null)
        {
            EffectInfo.GetDeactiveRequirementLists = (m) =>
            {
                return GetDeactiveRequirements(m);
            };
        }
    }

    // implement searching method
    public List<ConditionRequirement> GetActiveRequirements(IEnumerable<string> ids)
    {
        return activeRequirements.Where(m => ids.Contains(m.id)).ToList();
    }
    public List<ConditionRequirement> GetDeactiveRequirements(IEnumerable<string> ids)
    {
        return deactiveRequirements.Where(m => ids.Contains(m.id)).ToList();
    }
}
Probability
Probability makes the effect trigger based on chance. activeProbability = 0.4 means that when the effect's activeCondition is triggered, there is a 40% chance that the effect will continue to execute OnActive().
| Field | Data Type | Description |
|---|---|---|
| activeProbability | float | The probability (0-1) of the effect being activated |
| deactiveProbability | float | The probability (0-1) of the effect being deactivated |
When Probability is set to 0, the Effect System will skip the probability check.
Time Management
Different games may use different time units. For example, action or RPG games may use seconds as the time unit, while turn-based games might use round as the time unit. You will need to implement the time calculation logic based on your project's needs.
For games based on seconds, you can typically update the timer in Update, with delta being Time.deltaTime
void Update(){
    EffectSystem.Instance.TickEffectTimer(EffectSystemScriptableBuiltIn.TimerTickerId.Default ,Time.deltaTime);
}
For round-based games, update the timer in the callback for each round, with delta possibly being 1 (round)
IEnumerator Round(){
    while(true){
         EffectSystem.Instance.TickEffectTimer(1);
        yield return new WaitForNextRound();
    }
}
MaintainTime
Effect System provides a method to manage the time-based lifecycle of an effect. Use the maintainTime field to define how long an effect should remain active. If maintainTime is greater than 0, the effect will follow a time-based lifecycle. You can use TriggerTransType and EffectLifeCycleLogic to control more specific behaviors. On the other hand, if maintainTime is 0, the effect's lifecycle will not be affected by time.
The unit of "Time" is defined by the project, such as seconds, actions, or rounds. In the example below, we assume the unit of time is seconds.
Example:
var effectAddAtkSmall = new EffectInfo{
    id = "AddAtkSmall",
    type = "ATK_Constant",
    value = 100,
    maintainTime = 0, // No time-based lifecycle
    /// Other parameters are ignored in this example
};

var effectAddAtkMedium = new EffectInfo{
    id = "AddAtkMedium",
    type = "ATK_Constant",
    value = 200,
    maintainTime = 10, // 10-second duration
    /// Other parameters are ignored in this example
};

EffectSystem effectSystem;
IEffectableObject target;

effectSystem.AddRequestedEffects(target, effectAddAtkSmall);
effectSystem.AddRequestedEffects(target, effectAddAtkMedium);


var result = effectSystem.GetEffectSum( target, "ATK_Constant");
// result is 300

//wait 10 seconds
await Task.Delay(TimeSpan.FromSeconds(10));

var result = effectSystem.GetEffectSum( target, "ATK_Constant");
// result is 100
CooldownTime
An Effect can be activated and deactivated freely before being recycled. CooldownTime is used to restrict how long the Effect cannot be reactivated after it has been deactivated. It also uses TriggerTransType and EffectLifeCycleLogic to control more detailed behaviors.
Example:
var effectAddAtkSmall = new EffectInfo{
    id = "HealSelfSmall",
    type = "HealSelf",
    value = 100,
    maintainTime = 5,
    cooldownTime = 10, // 10-second cooldown
    activeCondition = "ConditionOnAttack",
    deactiveCondition = "AfterActive", //AfterActive is a built-in condition. The effect will deactivate immediately after OnActive() is triggered.

    /// Other parameters are ignored in this example
};

// Make a IEffectableObject
class MyCharacter: IEffectableObject {
    public void DoAttack(){
        effectSystem.EffectTriggerCondition("ConditionOnAttack", this);
    }
}

//Make a HealSelf effect
class Effect_HealSelf : EffectInstanceBase
{
    public Effect_HealSelf(EffectSystem effectSystem) : base(effectSystem)
    {
    }

     public override void OnActive(EffectTriggerConditionInfo condidionInfo)
    {
        Debug.Log("Heal Self Implementation")
    }
}

EffectSystem effectSystem;
MyCharacter character = new MyCharacter();

//apply effect
effectSystem.AddRequestedEffects(character, effectAddAtkSmall);

// Trigger HealSelf succeeded. Deactive immediately and start cooldown timer
character.DoAttack();

await Task.Delay(TimeSpan.FromSeconds(5));

// Trigger HealSelf failed. Because effect is still in cooldown
character.DoAttack();

await Task.Delay(TimeSpan.FromSeconds(5));

// Trigger HealSelf succeeded.
character.DoAttack();
Pre-define Enums
TriggerTransType
If the Effect is already active and OnActive() is triggered again, TriggerTransType can determine how the Effect should be handled:
| Field | Data Description |
|---|---|
| SkipNewOne | Ignore the repeated trigger request |
| CutOldOne | Call OnDeactive() first, then immediately call OnActive(). |
EffectLifeCycleLogic
EffectLifeCycleLogic provides some common lifecycle logic to reduce the hassle of creating Effects.
| Field | Data Description |
|---|---|
| None | Do nothing |
| OnlyActiveOnce | The effect will only activate once and will be recycled afterward |
| ReactiveAfterCooldownEnd | automatically activate after the cooldown time ends |
Manipulating Effect
The Effect System provides various methods for adding, removing, and querying effects. Below are some commonly used methods.
| Method | Description |
|---|---|
AddRequestedEffects | Adds effects to an IEffectableObject. In other words, create an effect instance owned by the IEffectableObject. EffectSystem will check ApprovedAddEffect() of the IEffectableObject before adding. |
RemoveEffectByTag | Removes all EffectInstances from an IEffectableObject by their tags. |
RemoveEffectsByType | Removes all EffectInstances from an IEffectableObject by their type. |
GetEffectSum | Gets the total value of all effects of the specified type on an IEffectableObject. |
GetEffectsByType | Retrieves a list of EffectInstances on an IEffectableObject based on their type. |
// Define two effects with the same type
var effectAddAtkSmall = new EffectInfo{
    id = "AddAtkSmall",
    type = "ATK_Constant",
    value = 100,
    /// Other parameters are ignored in this example
};
var effectAddAtkMedium = new EffectInfo{
    id = "AddAtkMedium",
    type = "ATK_Constant",
    value = 200,
    /// Other parameters are ignored in this example
};

public class Effect_ATK_Constant: EffectInstanceBase
{
    public Effect_ATK_Constant(EffectSystem effectSystem) : base(effectSystem)
    {
    }
}

IEffectableObject target;
//Get the EffectSystem using your dependency management solution
EffectSystem effectSystem;

effectSystem.AddRequestedEffect(target, effectAddAtkSmall);
effectSystem.AddRequestedEffect(target, effectAddAtkMedium);

/* or
effectSystem.AddRequestedEffects(
    target, new []{
        effectAddAtkSmall,
        effectAddAtkMedium
    }
);
*/

var sumValue = effectSystem.GetEffectSum( target, "ATK_Constant");
// sumValue is 300
var effects = effectSystem.GetEffectsByType(target, "ATK_Constant");
// effects.count = 2
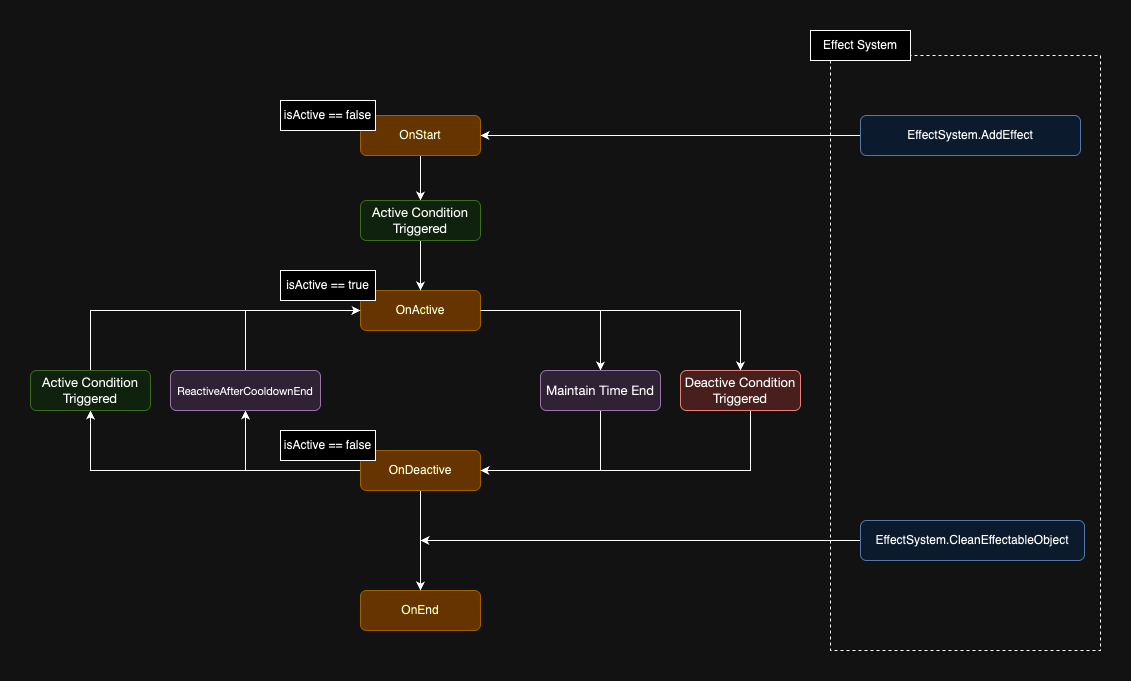
Lifecycle of an effect instance:
Runtime Value
Runtime value is a user-defined value, useful for projects that require complex value calculations involving multiple effect types.
See the follow example:
var effectAddAtkSmall = new EffectInfo{
    id = "AddAtkSmall",
    type = "ATK_Constant",
    value = 100,
    /// Other parameters are ignored in this example
};

var effectAddAtkMedium = new EffectInfo{
    id = "AddAtkMedium",
    type = "ATK_Constant",
    value = 200,
    /// Other parameters are ignored in this example
};

var effectAddAtkSmall_Ratio = new EffectInfo{
    id = "AddAtkSmall_Ratio",
    type = "ATK_Ratio",
    value = 0.05,
    /// Other parameters are ignored in this example
};

var effectAddAtkMedium_Ratio = new EffectInfo{
    id = "AddAtkMedium_Ratio",
    type = "ATK_Ratio",
    value = 0.08,
    /// Other parameters are ignored in this example
};

EffectSystem effectSystem;
IEffectableObject target = new MyCharacter();

effectSystem.AddRequestedEffect(target, effectAddAtkSmall);
effectSystem.AddRequestedEffect(target, effectAddAtkMedium);
effectSystem.AddRequestedEffect(target, effectAddAtkSmall_Ratio);
effectSystem.AddRequestedEffect(target, effectAddAtkMedium_Ratio);

public class MyCharcter : IEffectableObject{

    // Use IEffectableObject.GetRuntimeValue(string) to get the user-defined runtime value
    public float GetRuntimeValue(string parameterKey){
        switch(parameterKey){
            case "CurrentATK":
                {
                    var result_constant = effectSystem.GetEffectSum( target, "ATK_Constant");
                    var result_ratio = effectSystem.GetEffectSum( target, "ATK_Ratio");
                    // result_constant is 300
                    // result_ratio is 0.13

                    // The runtime value is defined by IEffectableObject in your project
                    // In this example, "ATK_Constant" defines the base ATK value, and "ATK_Ratio" defines the boost ratio. The actual result is calculated at runtime.
                    return result_constant * (1f + result_ratio);
                }
                break;
            default:
                return 0;
        }
    }
}
Remove or Clean Effect
The system will not automatically recycle the effect instance, so please remember to actively recycle it when the effect is no longer needed.
| Method | Description |
|---|---|
CleanEffectableObject | Removes all EffectInstances from an IEffectableObject. |
RemoveEffectByTag | Removes all EffectInstances from an IEffectableObject by their tags. |
RemoveEffectsByType | Removes all EffectInstances from an IEffectableObject by their type. |
In most cases, simply calling CleanEffectableObject on the IEffectableObject in play at the end of a game is sufficient.
void OnGameEnd()
{
    var effectables = GetEffectablesOnField();
    foreach(var obj in effectables)
    {
        effectSystem.CleanEffectableObject(obj);
    }
}

List<IEffectableObject> GetEffectablesOnField()
{
    //Get your IEffectables
}
SubInfo
SubInfo is an abbreviation for a EffectInfo under another EffectInfo. It's a design used to allow EffectInfo to carry additional EffectInfo, and can be applied to effects that rely on other effects. For example, when OnActive is triggered, it applies two effects to the owner.
To enable EffectInfo to find SubInfo, you need to first fill in all SubInfo IDs in subInfoIds. Then, register an event to look up SubInfo, allowing the Effect System to convert the IDs into actual EffectInfo instances at runtime.
public class SkillSystem
{
    //prepare your effects data
    static List<EffectInfo> effects = new List<EffectInfo>();

    // register methods to get EffectInfo
    void RegisterStaticMethods()
    {
        EffectDataProvider.SetEffectInfoDelegate(GetEffectByIds);
    }

    // implement searching method
    static List<EffectInfo> GetEffectByIds(List<string> effectIds)
    {
        if (effects == null || effects.Count < 1)
        {
            throw new Exception("Please complete fetch effect first");
        }
        return effects.Where(m => effectIds.Contains(m.id)).ToList();
    }
}
Then, you can access subInfos in EffectInstanceBase.
//Attach subInfos to self when triggered
public class Effect_Trigger_Attach : EffectTriggerBase
{
    public Effect_Trigger_Attach(EffectSystem effectSystem) : base(effectSystem)
    {
    }

    protected override void OnTrigger(EffectTriggerConditionInfo conditionInfo)
    {
        effectSystem.AddRequestedEffects(owner, info.subInfos);
    }

}